Even more knowledge


The first step toward a successful dental‑implant restoration is a thorough initial consultation. During this visit the dentist reviews your medical and dental history, examines the mouth, and determines whether you have enough healthy bone and gum tissue to support an implant. Diagnostic imaging—typically digital X‑rays, cone‑beam CT (CBCT) or 3‑D scans—follows the exam, providing a detailed map of bone volume, density, and the proximity of vital structures. These images allow the clinician to create a precise, prosthetically driven treatment plan and to discuss the timeline, possible bone‑grafting, and the expected healing period. Setting realistic patient expectations at this stage—such as the need for a multi‑month osseointegration phase, temporary restorations, and long‑term maintenance—helps ensure informed consent and a smoother restoration journey.
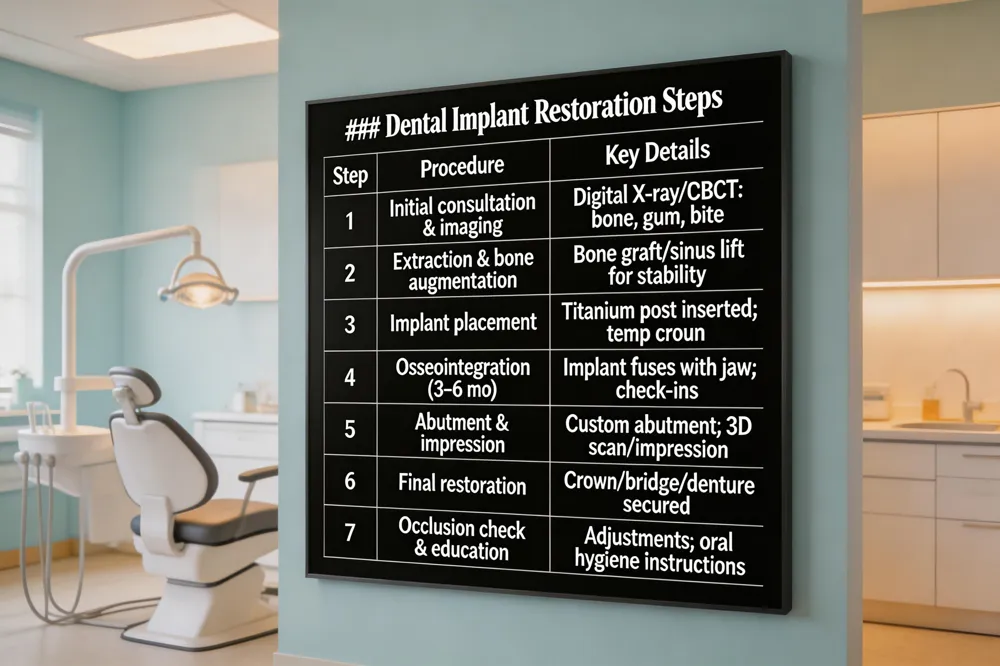 What is the process of dental implant restoration? The journey begins with a comprehensive consultation and digital imaging (X‑ray, CBCT) to evaluate bone volume, gum health, and bite. A personalized treatment plan is created, and if needed, bone grafting or sinus lift is performed to achieve primary stability. A titanium implant post is surgically placed into the prepared osteotomy site. A healing period of 3–6 months allows osseointegration, during which the implant fuses with the jawbone. After integration, an impression or 3‑D scan captures the exact position for a custom abutment. The final restoration—crown, bridge, or denture—is fabricated from porcelain, zirconia, or lithium disilicate, then securely attached to the abutment. Occlusion is checked, adjustments made, and the patient receives oral‑hygiene instructions.
Dental implant process step by step
Full mouth dental implant procedure steps
Step‑by‑step dental implant procedure photos Pre‑operative X‑ray, surgical flap elevation, osteotomy drilling, implant insertion with healing cap, and final crown‑filled smile.
Full dental implant video A detailed video walks patients through consultation, surgery, healing, and final restoration, illustrating each stage for clear understanding.
Tooth implant process timeline
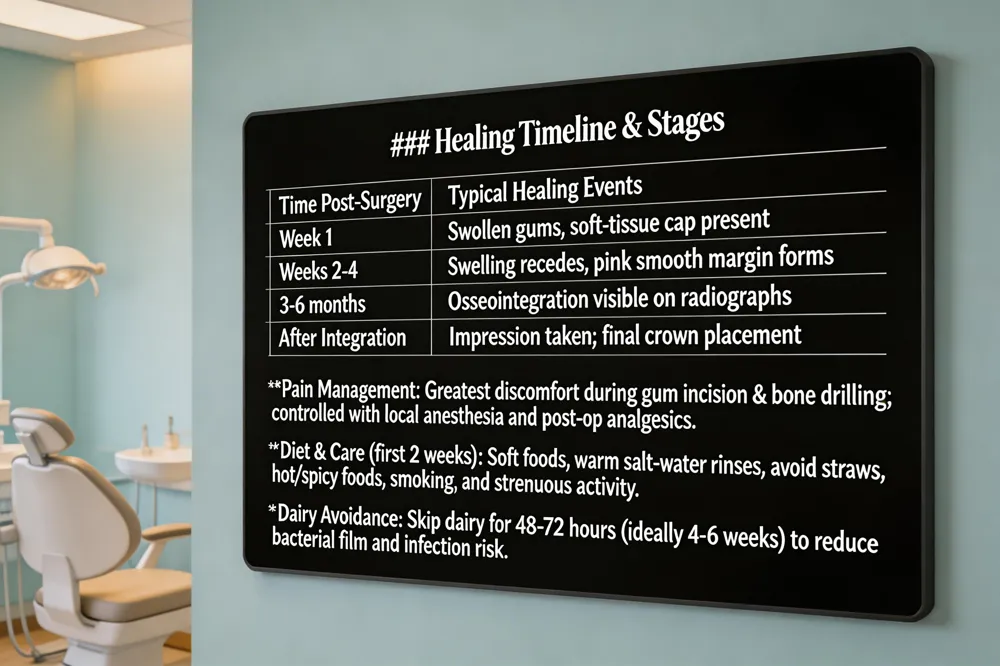
The journey typically spans 3‑6 months from the first consultation to the final crown. After a comprehensive exam and 3‑D imaging, any required extractions or bone grafts heal for about 4 months. The implant fixture is then placed, followed by a 4‑6‑month osseointegration phase with weekly check‑ins. Once integration is confirmed, the impression is taken, the lab fabricates the abutment and crown, and the restoration is placed within 2 weeks.
What’s the most painful part of a dental implant?
Patients feel the greatest discomfort when the surgeon incises and lifts the gum tissue and during the bone‑drilling step that creates the implant socket. Local anesthesia and post‑operative analgesics keep pain manageable; swelling and tenderness subside within a few days.
Dental implant healing stages pictures
Why no dairy after dental implant?
Dairy leaves a protein‑rich film that can harbor bacteria and interfere with clot formation, increasing infection risk. Its sugars also fuel bacterial growth. Avoid dairy for the first 48‑72 hours, and ideally for the full 4‑6 week healing period.
Dental implant stage 2 recovery
During the first two weeks post‑surgery, maintain gentle oral hygiene, use warm salt‑water rinses, and follow a soft‑food diet (smoothies, soups, mashed potatoes). Avoid straws, hot or spicy foods, and strenuous activity until the tissue has sealed.
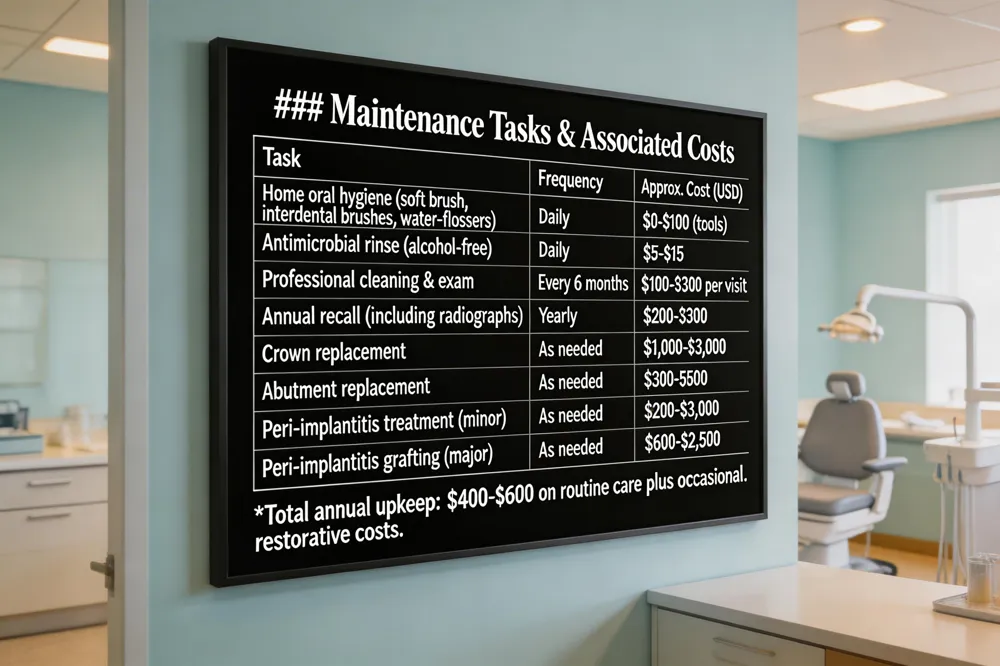 Effective long‑term implant care begins with diligent oral hygiene. Brush twice daily with a soft‑bristled or electric brush, use interdental brushes, floss threaders, or a water‑flosser to clear plaque around the abutment and crown, and finish with an alcohol‑free antimicrobial rinse. Professional cleanings every six months are essential; they cost $100‑$300 per visit and include probing of soft‑tissue health and periodic radiographs to monitor bone levels.
Maintenance cost – Annual implant upkeep averages $400‑$600, covering bi‑annual check‑ups, cleanings, specialised home‑care tools ($50‑$100) and occasional crown or abutment replacement ($1,000‑$2,000 for crowns, $300‑$500 for abutments). Treating peri‑implantitis or bone loss can add $200‑$3,000 for minor cases and $600‑$2,500 for grafting procedures.
Implant maintenance PDF – A downloadable guide outlines daily brushing, flossing, and water‑flossing steps; professional recall schedule; radiographic monitoring; and warning signs such as redness, swelling, bleeding on probing, or pus. It also recommends gentle, implant‑safe tools and antiseptic rinses for high‑risk patients.
Signs of trouble / peri‑implantitis – Early detection of inflammation, pain, mobility, or radiographic bone loss is critical. Prompt intervention with professional cleaning, antimicrobial therapy, or surgical grafting can preserve the implant.
Answers to common questions – Maintenance typically costs $200‑$300 per year; a full‑mouth implant protocol follows the same hygiene and recall regimen; restoring a single implant ranges from $100‑$300 for adjustments to $1,000‑$3,000 for a new crown; endosteal implants run $1,500‑$3,000 each before restoration; and patients often wish they knew the multi‑month timeline and importance of bone health before starting treatment.
What is the most feared dental procedure?
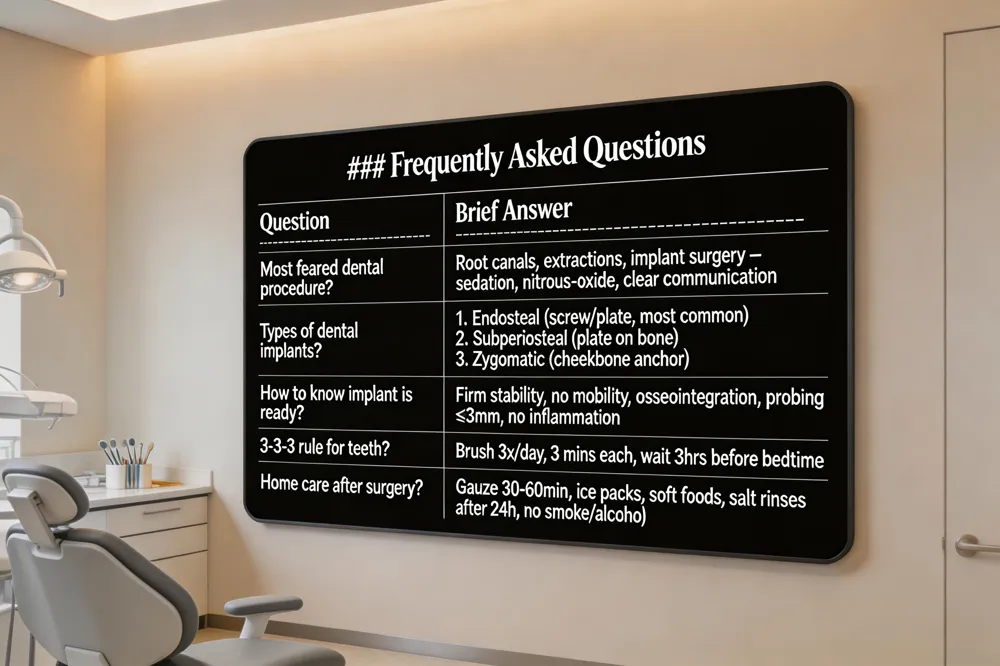
Patients most often dread root canals, extractions, and implant surgery because of anticipated pain and loss of control. Discuss anxiety with Dr. Sterling or Dr. Skurnick, explore nitrous‑oxide or oral sedation, and use deep‑breathing techniques; proper anesthesia makes the procedure comfortable.
What are the 3 types of dental implants?
The three primary categories are:
How to check if an implant is ready for restoration?
Readiness is confirmed when the implant shows firm clinical stability, no mobility, and radiographic evidence of complete osseointegration. Soft‑tissue health must be good (probing depths ≤ 3 mm, no inflammation). Many clinicians also use resonance‑frequency analysis or torque testing before placing the final abutment.
What is the 3‑3‑3 rule for teeth?
A mnemonic suggesting brush three times a day, three minutes each time, then wait three hours before bedtime. Evidence‑based guidelines recommend brushing twice daily for at least two minutes, but the rule can help reinforce diligent oral care.
Home care after dental implant surgery
Apply firm pressure with gauze for 30‑60 minutes until bleeding stops, then replace as needed for 24‑48 hours. Use ice packs, keep the head elevated, and follow a soft‑food diet (yogurt, smoothies, applesauce) for the first week. Begin gentle warm salt‑water rinses after 24 hours, brush carefully with a soft brush, avoid smoking/alcohol, and attend scheduled follow‑up appointments.
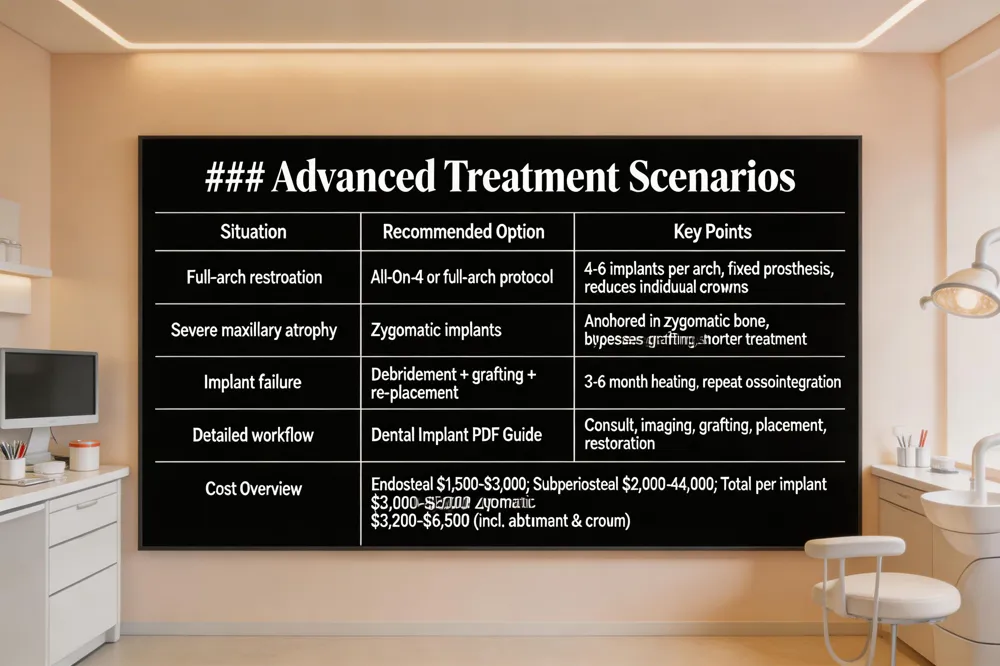 Full‑mouth restoration often uses All‑On‑4 or full‑arch protocols, where four to six strategically placed implants support a fixed prosthesis, eliminating the need for individual crowns and preserving bone. Zygomatic implants are reserved for severe maxillary atrophy; they anchor in the zygomatic bone, bypassing the need for extensive grafting and can reduce treatment time. When an implant fails—often due to inadequate osseointegration, overload, or peri‑implantitis—the site is surgically cleared, bone grafted if needed, and a new fixture placed after a 3‑6‑month healing period before restoration.
Dental implant procedure step by step PDF – A downloadable guide outlines the workflow: comprehensive consultation with 3‑D imaging, bone graft or sinus lift if required, surgical placement of a titanium fixture, a 3‑6‑month osseointegration phase, impression taking, abutment placement, and final crown or bridge attachment.
Home care after dental implant surgery – Apply firm pressure with gauze (or a damp tea bag) for 30‑60 minutes until bleeding stops, then replace as needed for 24‑48 hours. Use prescribed pain relievers and antibiotics as directed, follow a soft‑food diet for the first week, begin gentle warm salt‑water rinses after 24 hours, brush with a soft brush, avoid spitting, use ice packs for swelling, keep the head elevated, and refrain from smoking, alcohol, and strenuous activity for 10 days.
Types of dental implants cost – Endosteal implants run $1,500‑$3,000 per unit; subperiosteal implants $2,000‑$4,000; zygomatic implants $3,000‑$5,000. Including abutment and crown, the typical U.S. cost per implant averages $3,200‑$6,500, with additional fees for grafts, sinus lifts, or custom restorations.
Begin by scheduling a comprehensive consultation at Gentle Dentistry of Staten Island. During this visit the clinician will review your medical and dental history, perform a thorough oral examination, and capture 3‑D imaging to assess bone quality and identify any potential obstacles. Based on these findings a personalized treatment plan is created, outlining any needed bone grafts, the exact implant placement, the type of abutment and crown, and a realistic timeline for healing and restoration. Once the implant is placed and osseointegration is confirmed, you will be enrolled in a maintenance program that includes regular professional cleanings, detailed oral‑hygiene instructions, and periodic radiographic checks. Consistent adherence to this plan preserves implant health and ensures long‑term function and aesthetics for you.